InstaWidget

Recent Update

Choosing Black And White

0 comments
You must forgive that this is merely the thought process of a hobbyist, rather than a tutorial from an expert. In a world awash with blinding, over-saturated colour photos, plenty has been written on this subject in response, but I felt it might help some readers (especially those just starting out in photography) to elaborate on my decision-making process and reasons for rendering or shooting an image in black and white (B+W). Your rationales may be different, of course, but by articulating mine it might help an understanding of what makes black and white images so appealing.
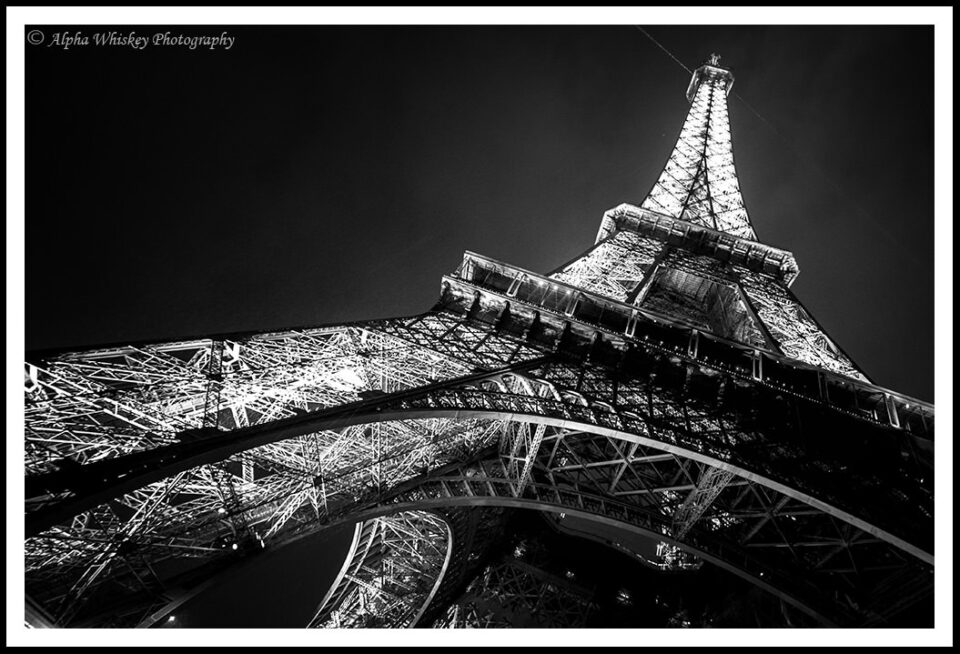
1-La-Tour-Eiffel
Rest assured I absolutely love colour, and when I first started shooting eons ago I was somewhat indifferent, perhaps even a little averse, to B+W. Colour was everything, and even the simple juxtaposition of primary colours in an image was satisfying enough.
2-Shaftesbury-Theatre
For some images, colour is either part or all of the subject. A beautiful sunset, for example, doesn’t look very spectacular de-saturated of its colour. Nor do richly colourful plants or flowers. But, as I have mentioned in previous articles, stripping colour away from the right image can deconstruct its components to emphasise their shapes, textures and light, and each of these alone can form the subject of the image regardless of what they describe within it. Perhaps even the mood of the scene can change in the absence of colour.
3 Zagreb
Revealing the inter-tonal relationships or light and shadow within an image can evoke a different response or appreciation from the viewer than if the image is in colour. Colour can thus be a distraction from or a mask for such relationships. B+W is also versatile enough to apply to almost any subject, be it landscape, street, wildlife or portraits.
4 Jena
Whenever I take an image now, I almost always ask if the colour adds anything to it. Is the colour necessary or expendable to the image, and would the image therefore be just as, if not more, effective without the colour in it? I’ll usually shoot in colour with a view to rendering in B+W afterwards, but on occasion I’ll use one of the Art Filters on my camera and shoot directly to B+W in-camera. This allows me to see what the result could look like, and if it’s not to my liking, my camera (Olympus EM-5) generously creates an original colour RAW file alongside it so that I may adjust that on my own in post.
5 St Paul's Cathedral
(SOOC JPEG from the camera’s B+W Art Filter)
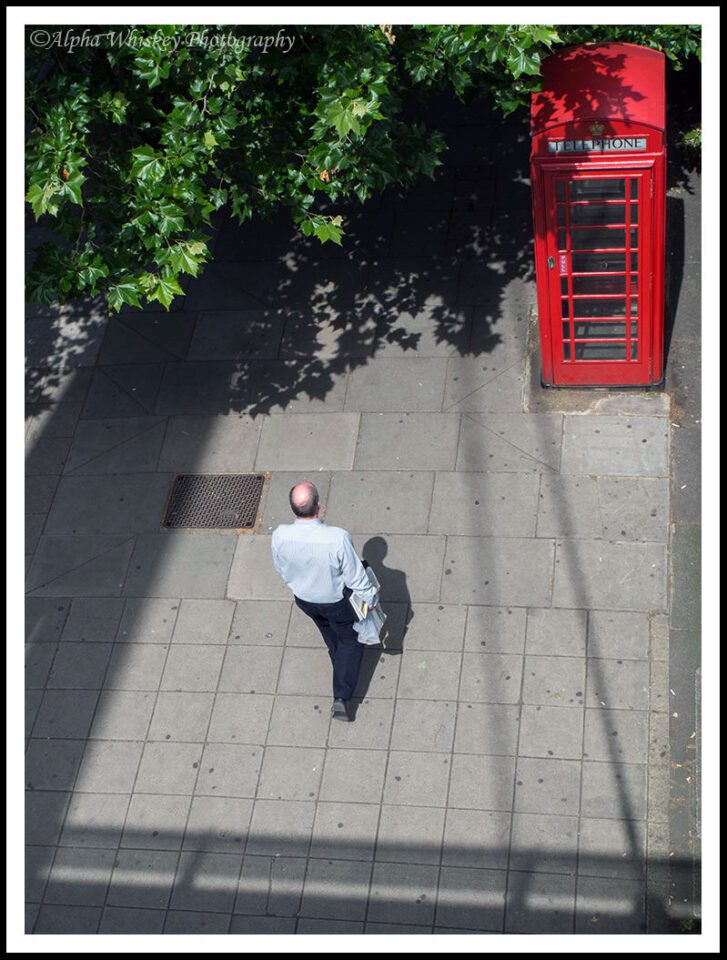
With time one learns to ‘see’ beyond the colours of a scene, switching them off in the minds eye. One can then determine if an image would work in B+W before making the shot, and this opens up many more possibilities to our shooting experience. Below is such an example. A simple shot taken from a bridge of a guy walking down the street, and one I took knowing I wanted to render it in B+W later. He is framed by some shadow and with some deep colours from the foliage and phone box. Not a particularly interesting shot.
6
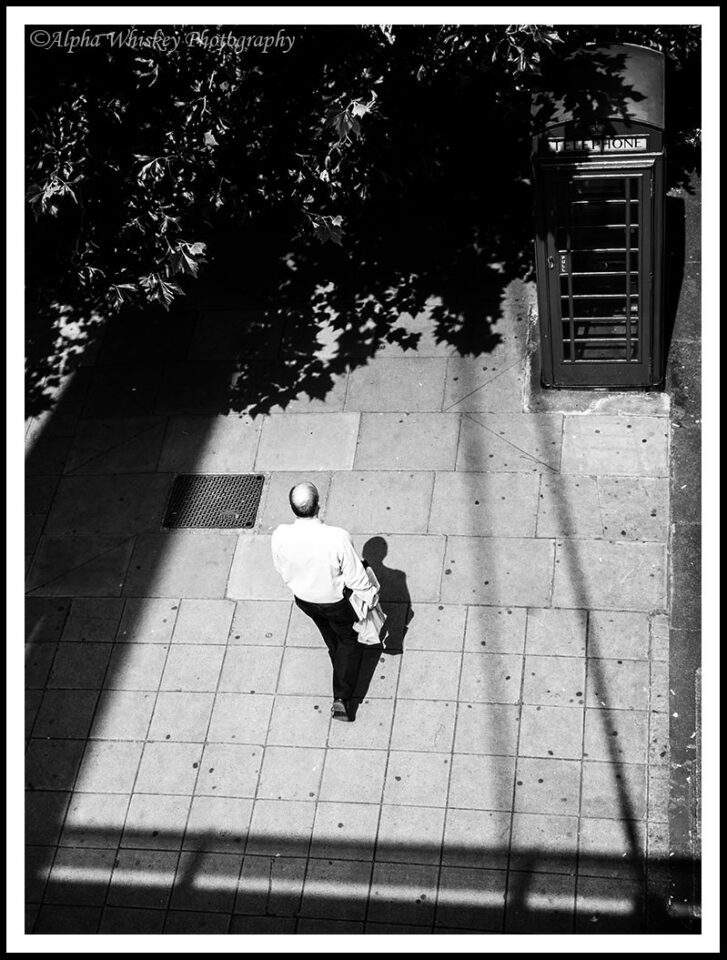
But with the colour removed and rendered B+W, it becomes more about the shadow frame and the contrast between the light and dark, emphasising the man’s place in the centre. He is also partially framed by his own dark trousers and shadow. Arguably still not a very interesting subject, but perhaps rendered in a more interesting way without the distraction of colour. Seeing the shadows and the frame it created are what inspired me to think of a B+W rendition; then all I had to do was wait for someone to walk into the frame.
7
Another example below, taken on the same day, with a view to rendering in B+W later in post. Again, just a random, uninteresting shot of a woman walking through a passageway on London’s Strand. But the contrasting areas of light and shadow gave me the idea for B+W here.
8
And with the colour removed, this contrast between light and shade is emphasised. The random pedestrian now becomes something of a focal point as the intersecting light and shadow seems to lead the eye towards her.
9
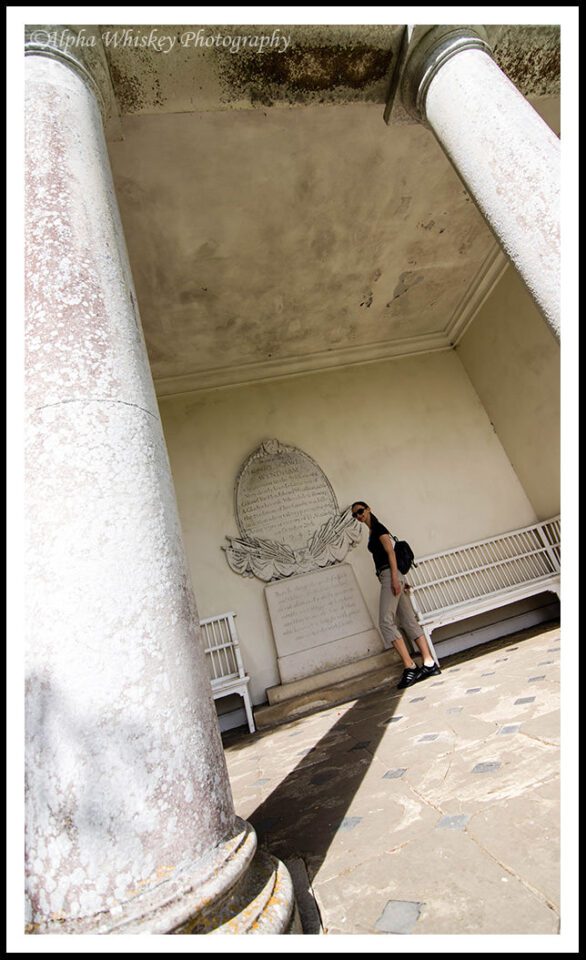
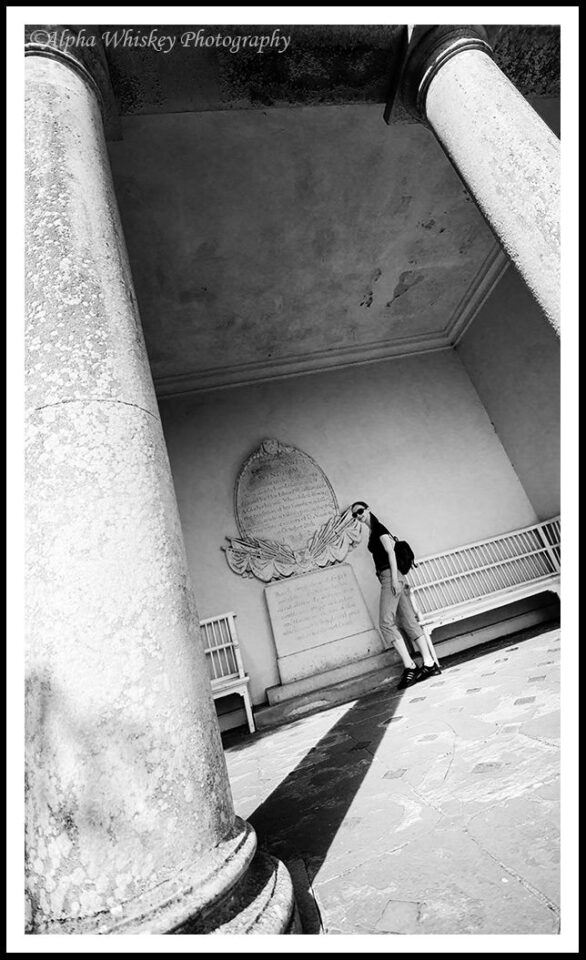
Here’s an example with a more specific intent. My friend wanted a photo of herself inside this temple.
10 Petworth Temple
In colour it’s not a very interesting shot to me, but in B+W I can use the shadow from the pillar to lead the eye to her. With some selective curves adjustment and dodging and burning, the contrast in black and white render her more starkly to the viewer’s eye as the focal point in the image.
11 Petworth Temple
B+W often has connotations of something old or historical, and to that end it can be used to evoke a bygone era. Many of the shots I take in historical buildings will be rendered in B+W for this very reason. Both externally…
12a Bodiam Castle
…and internally.
13a The Vyne
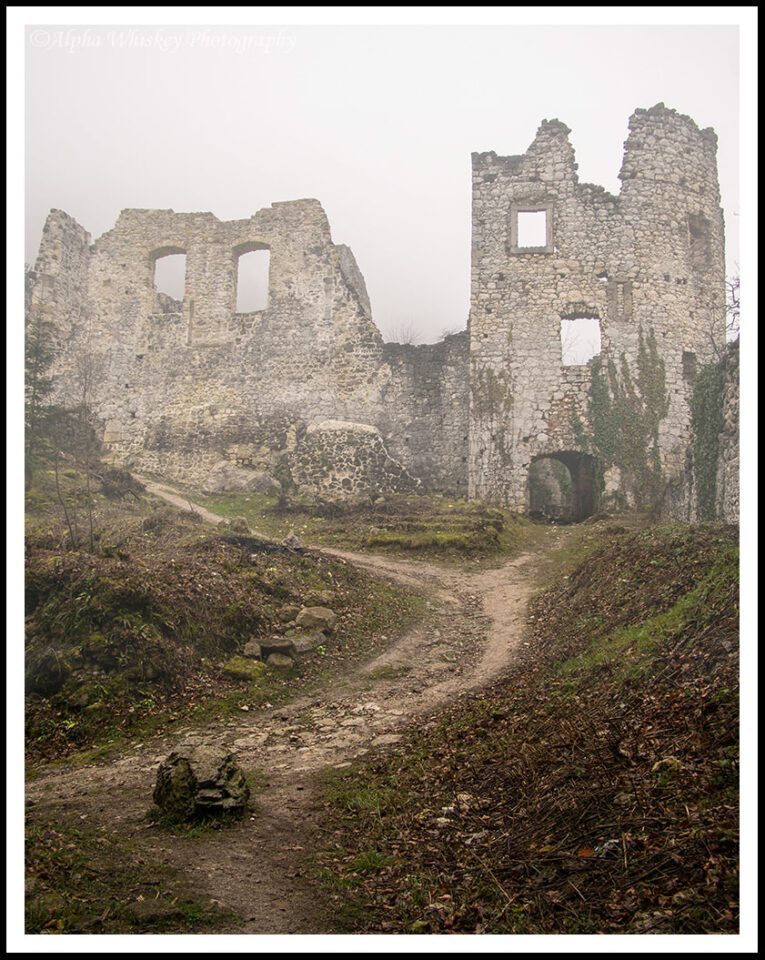
Additionally, mood and atmosphere can also be affected by B+W. When I found the ruins of this fortress atop a hill in Croatia an eerie mist was descending upon it.
14 Samobor Fortress
Atmospheric enough, but then removing the colour made it seem even more desolate and mysterious to me.
15 Samobor Fortress
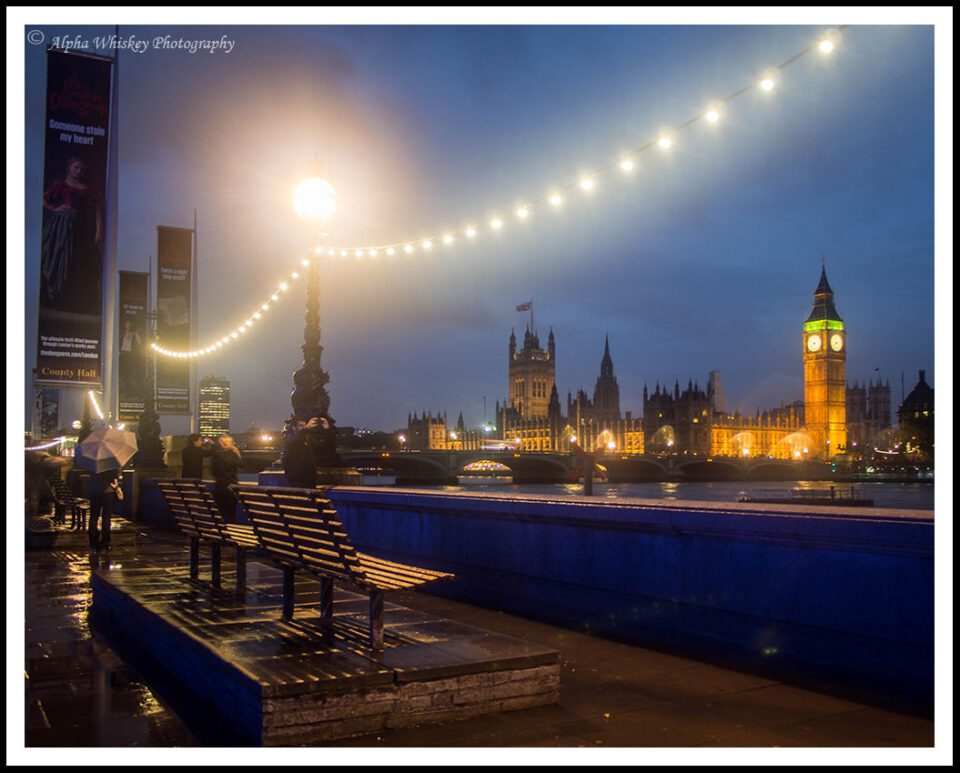
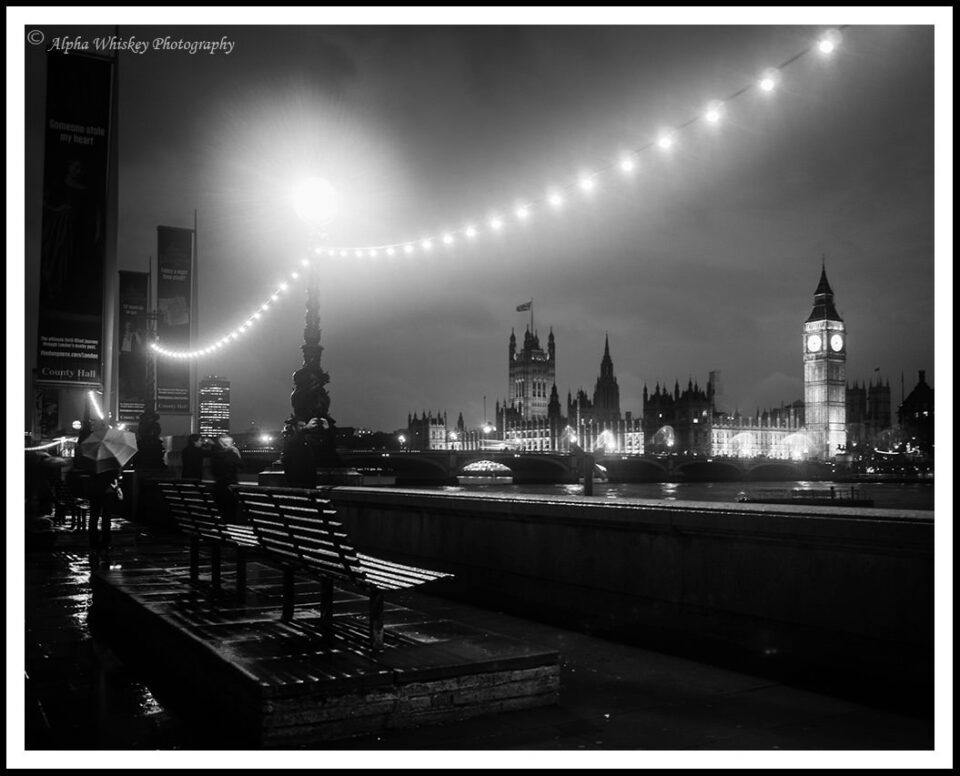
This shot below of Westminster Palace from the South Bank was taken in the rain. I rather like the colour version; it has areas of primary colours and light playing of each other and balancing the image (in my view). The diffuse lighting and shiny wet surfaces allude to the mist from the rain.
16 Westminster from South Bank
Now without the colour, I think it has a little more atmosphere, with the light areas breaking up a somewhat eerie scene.
17 Westminster from South Bank
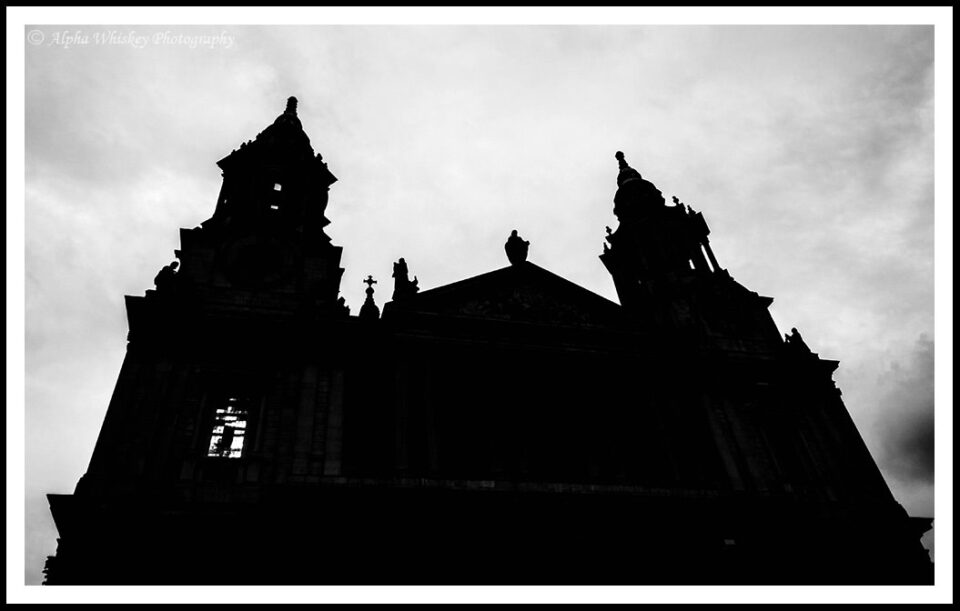
One of the commonest reasons for rendering or shooting an image in B+W is to hide a dreary or featureless sky, and I’m not immune to that reason. I like to shoot on nice days with clear skies, but bad weather lends itself to B+W photography. I took a couple of friends on a photowalk around St Paul’s Cathedral a while ago and the sky was a dull grey. So I used the B+W Art filter on my camera to shoot this silhouette of the cathedral, exposing for the light areas to deepen the blacks (SOOC JPEG).
18 St Paul's Cathedral
Below is how it would have looked like otherwise (processed from the RAW file). Dull sky and dull image. The B+W above is far more dramatic and atmospheric.
19 St Paul's Cathedral
In contrast, you might use B+W to make a sky more dramatic, especially where there is an interesting cloud pattern. In the shot below, the sky is already the subject of the image, with the train giving a horizon to anchor the shot.
20 Canary Wharf
Without the colour, the sky looks more dramatic to me and trails my eye down to the silhouette of the train.
21 Canary Wharf
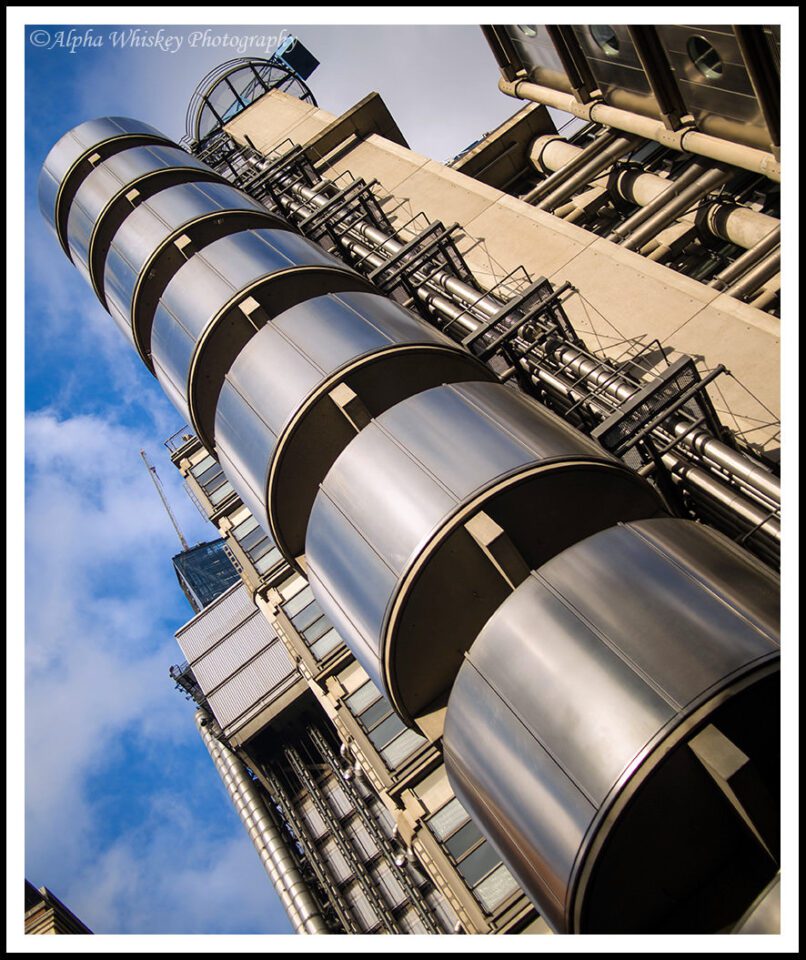
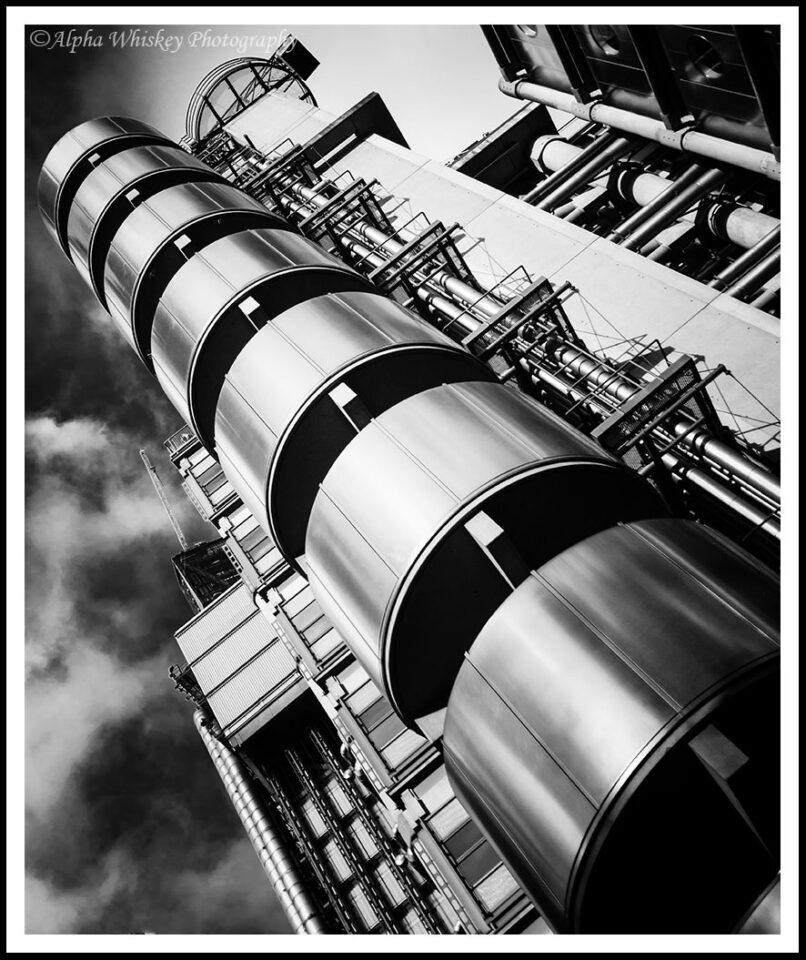
With architecture, B+W is often more effective at emphasising the geometry and shapes of a building. I have also tilted this image to take the perception bias away from the building and onto the lines and shapes leading the eye into the shot. A slight curves adjustment to deepen the blacks and some dodging on the cylinders help too. (I also removed the distraction from the bottom left corner.)
22 City Of London
22a City Of London
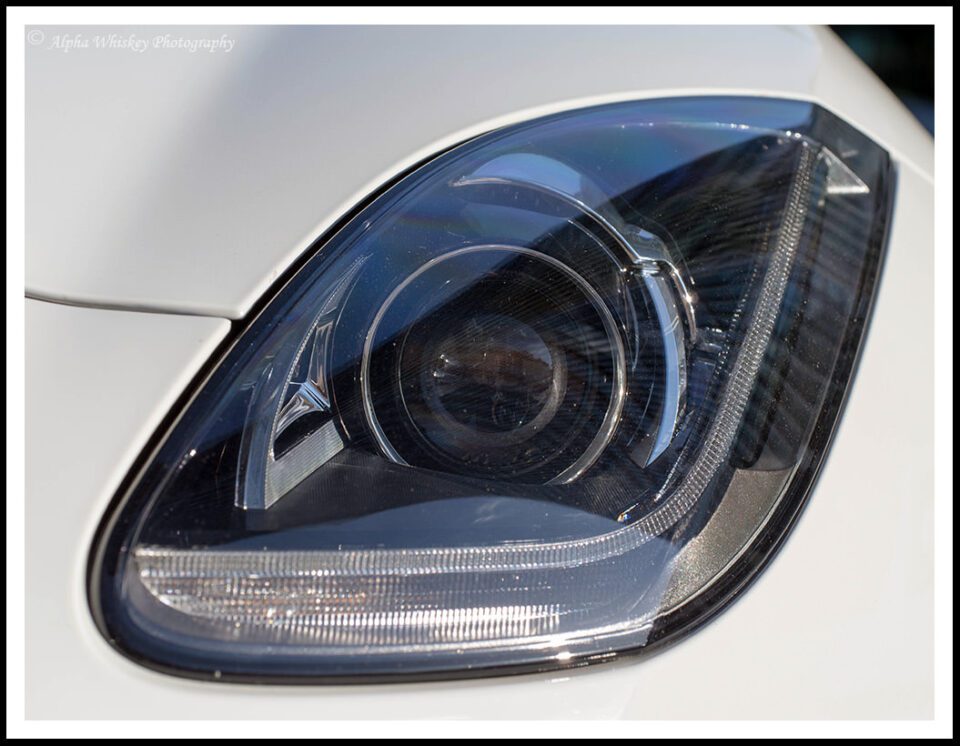
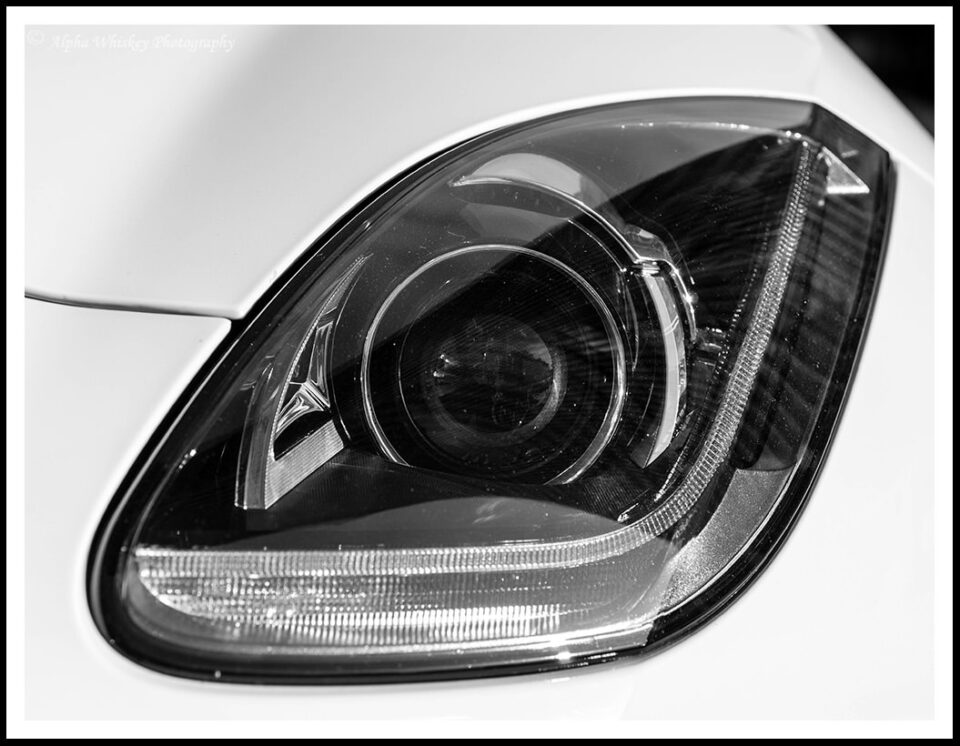
Even with simple details, B+W can draw out details and textures, as in this headlight of my…. ahem…. someone’s Jaguar F-Type.
23 Jaguar F-Type
24 Jaguar F-Type
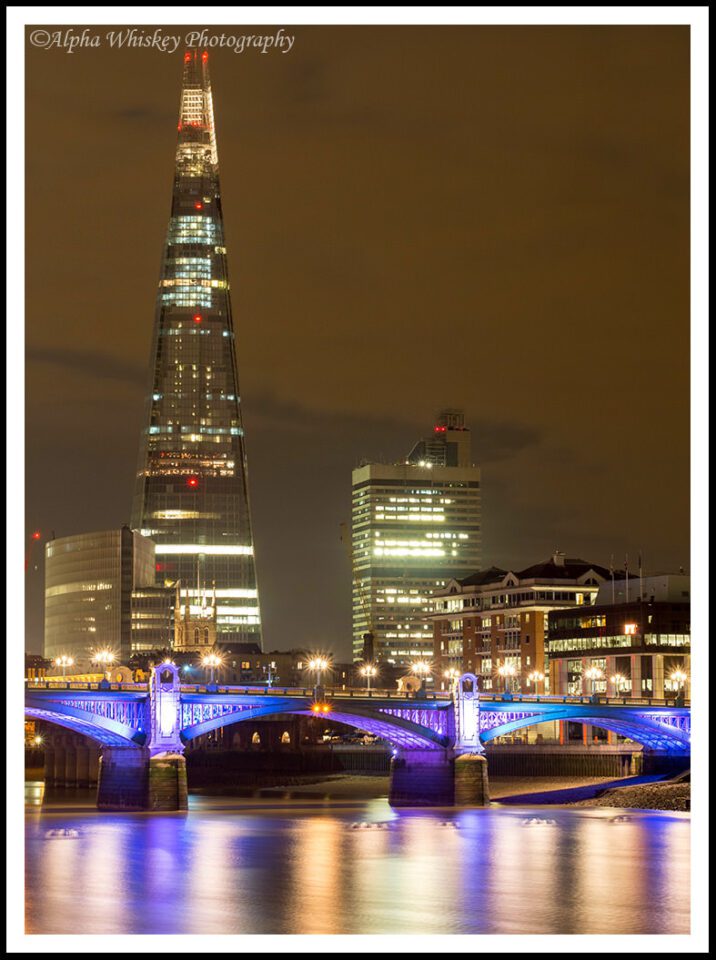
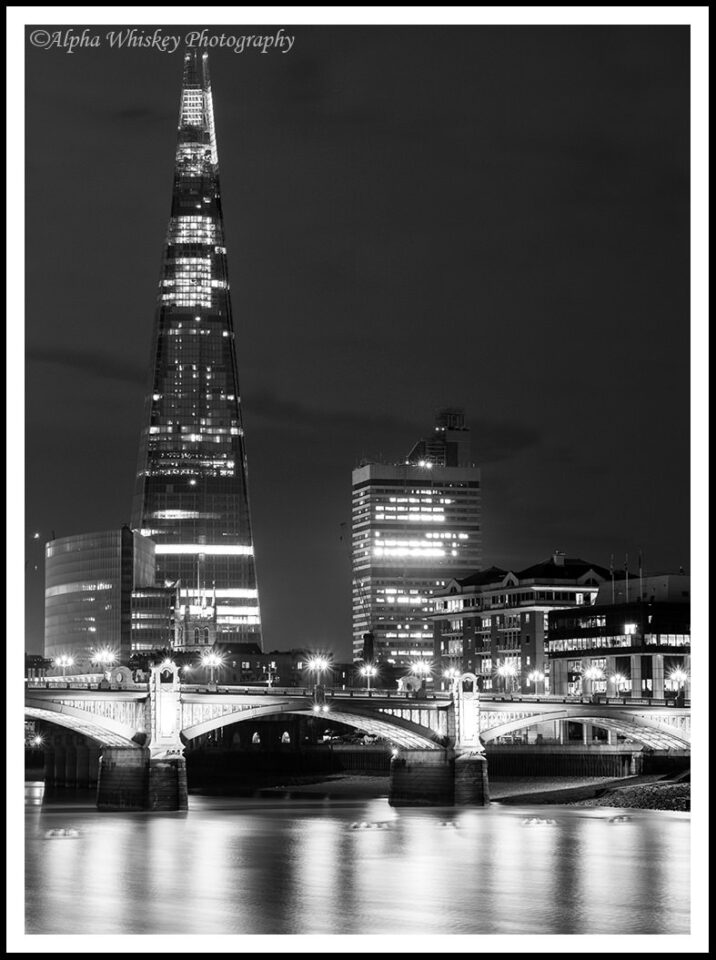
I had discussed my attempts at fine art B+W landscapes in a previous article, but cityscapes lend themselves to this treatment as well. This long exposure of the Shard in London appeals to me in colour, but in B+W it seems to have more of a fine art gravitas, if I can put it that way.
25 Shard
26 Shard
In terms of processing, I use the B+W tab in Lightroom and then selectively move the colour sliders around in the HSL/Color/B&W tab below (as described in a previous article). I’ll also dodge and burn to emphasise the subject, or apply a curves adjustment to increase contrast. If I shoot in colour first then I always shoot RAW, as this gives me far greater latitude in exploiting as much tonal range in the scene as I can. Processing JPEGs, you may find there are more artefacts and obvious demarcations between the tones. The EM-5, however, makes pretty good B+W JPEGs in camera using its Art Filter.
Of course, much of this is my subjective perception, and you may have your own take on rendering or shooting in B+W. But perhaps this may articulate a few of my thoughts on the subject for some people who are still as tentative as I used to be in making B+W images. Thank you for reading.
Top Photography Sins and Mistakes to Avoid

0 comments
It seems that many photographers go through a certain cycle of mistakes and errors during their photography journeys and careers. Some of these mistakes and photography “sins” have become so predictable, that it is usually easy to identify one’s level simply by looking at their recent work. During my past workshops and one-on-one sessions, I have seen many images that could have been great, if it was not for one or more of the typical mistakes outlined below. I have personally made many of these mistakes in the past and some of them I am still guilty and ashamed of even today, although I continuously work hard on getting rid of them. The article below is not meant to offend or criticize anyone. Although it might sound a bit arrogant or snobby, that is certainly not the intent – in fact, most of the images presented below are mine.

1) Using Selective Color

Using selective color is a cheesy thing of the past. It was cool back in the day when Photoshop layers were introduced, but the whole trend is now a joke. If you find yourself isolating those pretty flowers from a bridal portrait, please stop. Go back and wipe those pictures out from your portfolio. There are very very very rare cases when selective color really works and I can almost guarantee you that none of your images qualify.

Selective Color
Selective Color

2) Those “Dreamy” Portraits

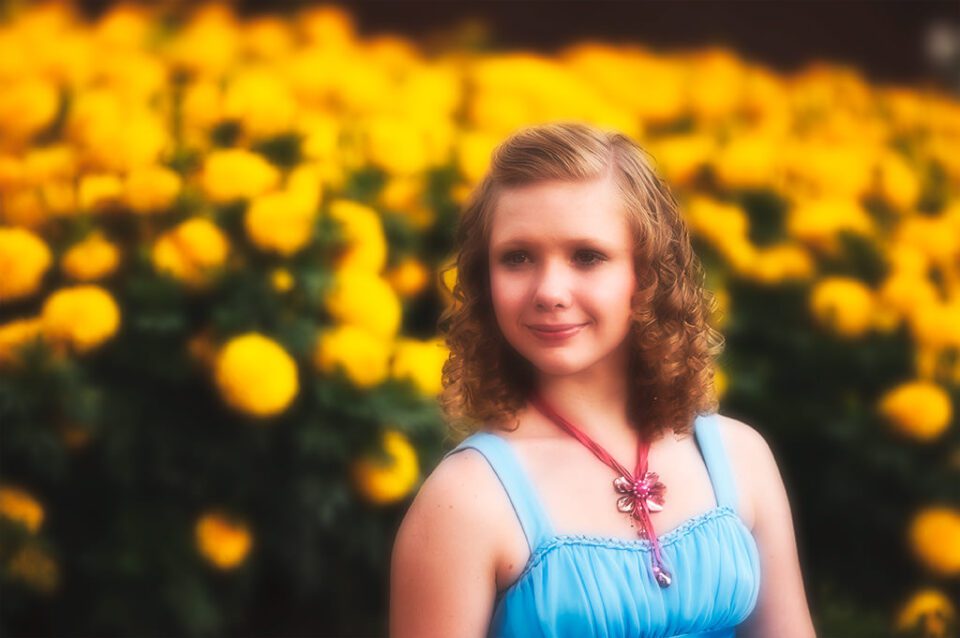
Diffusion filters suck, plain and simple. They might have looked good back in 1960’s, but that’s about it. If your photography teacher wants you to use a blur filter for portraiture, or you find yourself experimenting with Photoshop blur filters to make your portraits look “dreamy”, time to go back and learn better ways to capture portraits.

Dreamy Portrait
Dreamy Portrait
Diffused, blurry portraits are a thing of the past. Time to move on.

3) Impaling and “Horning” Your Subjects

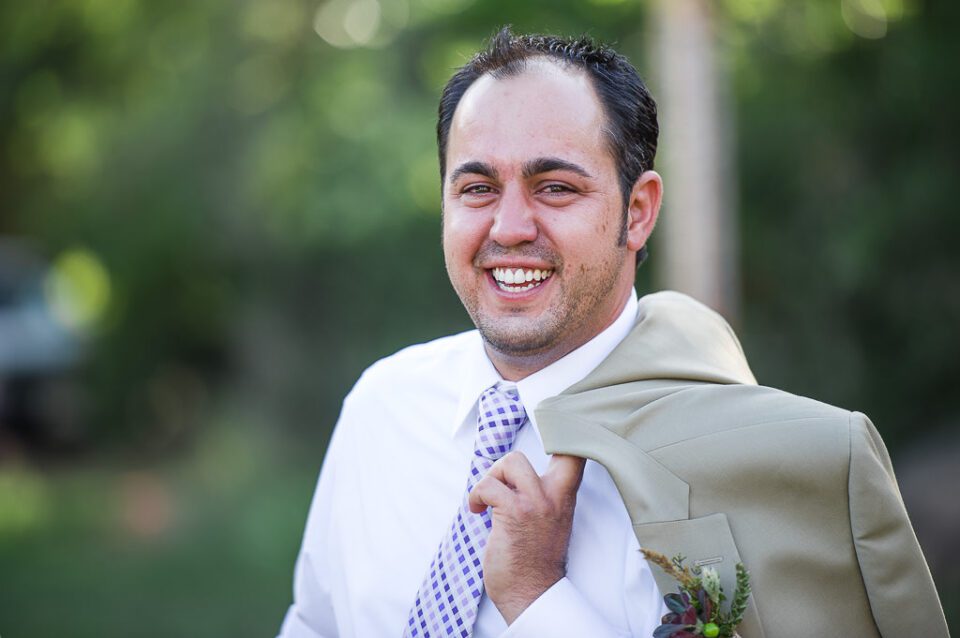
Paying attention to what happens in the background is important when photographing people and other live beings. When photographing subjects with trees, electric poles and other similar objects in the background, avoid “impaling” your subject with the background objects. Pay close attention to the background when composing your shot and if you see anything that clearly stands out behind your subject(s), move around and see if you can find more suitable framing that works. For the below shot of the happy groom, all I had to do was move a little bit to the right and there would not have been a large stick coming out of his shoulder:

Impaled Groom

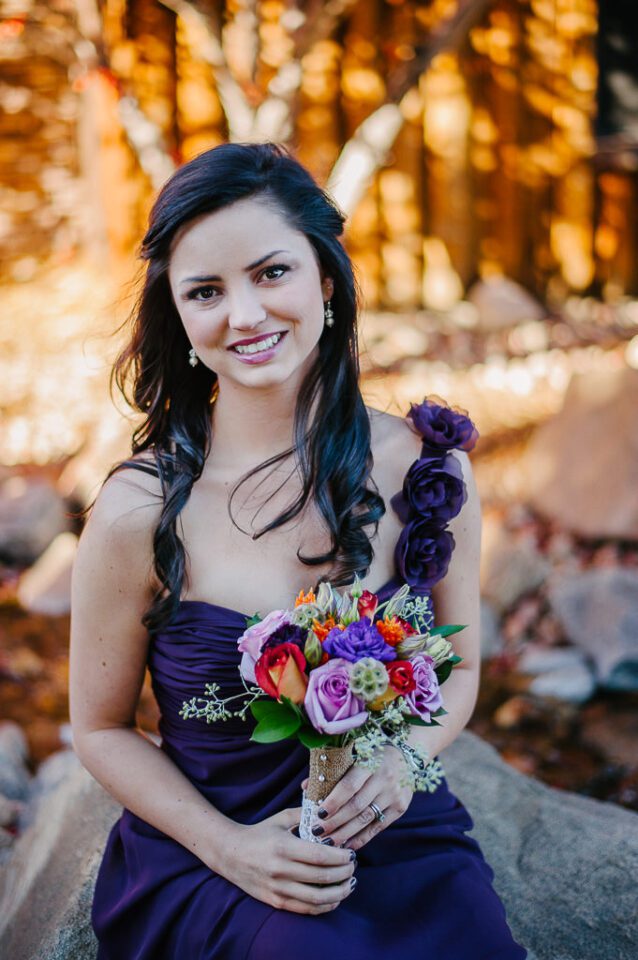
And this pretty bridesmaid would have looked a lot better without the four “horns” in the background:
Girl with Horns

4) Eye-Level Perspective

Most of us are guilty of walking around straight and forcing eye-level perspective in every shot. If you photograph children or pets, get down on your knees or lay down to get a much better, more natural perspective. Shooting subjects from above is rarely appealing, because you are most likely including the unattractive floor / ground and other objects in the background that should not be in your shot. Change your perspective more often and be creative with how you present your subject.

Different Perspective

5) That Bokeh Craze

If you find yourself in love with bokeh too much and the term “creamy bokeh” is what you are after when photographing your subjects, it might be time to put your favorite 85mm f/1.4 cream machine back in the closet and force yourself to shoot with a wide angle lens for a few months. Completely isolating your subject from the background often takes away the essence and the story of the portrait.

Lola Elise Portraits and Weddings (29)
Bokeh Craze

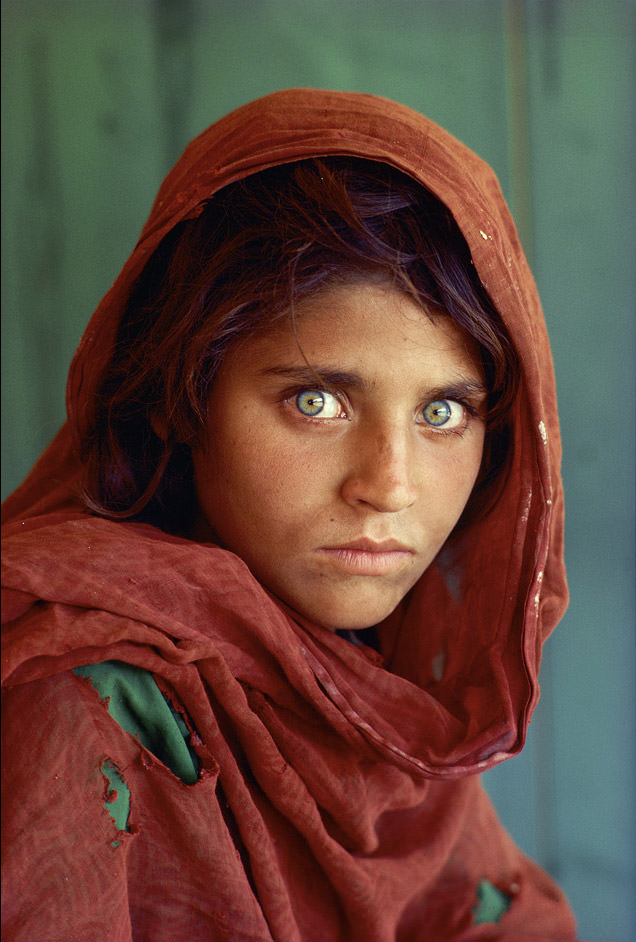
Take a look at some of the iconic and award-winning portraits and note how the photographer placed the subject relative to the background. You will see that without the background, the portrait often loses its essence. It is rare to find story-telling photographs that focus only on the subject alone. Steve McCurry’s “Afghan Girl” is a rare example that really works and even in this case, if it was not for the torn red veil standing against the green background, the captivating eyes of the girl and marks on her face, the picture would have never become so iconic.

Steve McCurry's Afghan Girl
Steve McCurry’s Afghan Girl

Unless your subject alone can tell a story, you should always do your best to include the surrounding environment, since it will not only complete the image, but also make it that much more interesting to look at.

6) The “Natural Light Photographer”

Whenever I hear someone say “I am a natural light photographer”, I already know what it means. 99% of the time, it simply translates to “I have no idea how to use flash”. While natural light is indeed amazing to use in most situations, if you master flash photography, you can make your images appear natural without that “flash” look. Flash is amazing, because it is versatile – you can create light when it does not exist; you can shoot indoors without cranking up that ISO; you can imitate sunrise/sunset and you can eliminate those hard shadows when shooting in mid-day sun. If you have no idea how to use flash, it is time to learn and move away from your only “natural light photographer” mentality.

Lola Elise Portraits and Weddings (3)
Beauty Portrait Captured with Flash

There are many great photographers that have mastered both natural light and flash, and they do not fall into this category.

7) Converting Blurry Images to Black and White

Although sharp photos are not an absolute requirement in portrait photography, you will rarely see magazines and online publications publish photos that are blurry due to bad focus and camera shake. There is a clear difference between intentional blur and blur due to photographer’s error. I have seen many examples of portrait and wedding photographers resorting to black and white conversion when they capture an important photo that they could not capture properly. Why black and white? Because it makes the photo appear like old B&W film photos, which were often blurry, due to technical limitations of camera gear in the past. Hence, such black and white conversion technique is used to hide mistakes. While I personally love beautiful black and white photos, seeing a large number of badly focused photos converted to black and white just tells me that either the photographer has no idea how to properly focus, or has technical problems with their gear. If you find yourself resorting to such conversions too often, perhaps it is time to learn how to use those autofocus modes. And if your gear is malfunctioning, it might be time to get it properly serviced and calibrated.

8) Using Wide Angle Lenses for Portraits

That nifty fifty lens of yours is great for everyday photography and portraiture. But if you put it close enough to a subject, it will surely distort their face. Anything below 60-70mm tends to distort and “warp” subjects when they are too close, making their facial features appear unnaturally big. It is one thing to go wide for fun, and another to distort a good looking subject by either going too wide or being too close. If you use a 50mm lens, don’t try to frame your shot by filling the subject’s face, especially on full-frame cameras. If you really need to get that close, use a longer focal length lens. An 85mm portrait lens would fit be much more suitable for the job.

Wide Angle Close-Up
Wide Angle Close-Up

9) Over-Saturation Galore

I have seen so many great images butchered with crazy colors. When I teach workshops, I always ask people to stay away from the “Saturation” sliders as much as possible. A little bit of color saturation is not bad, but too much color makes images appear fake and unnatural. While the definition of color and its intensity varies greatly between photographers, an over-saturated image is easy to identify. Stay away from too much color saturation and do your best to make your photos appear as natural and balanced as possible.

Over-Saturated Image

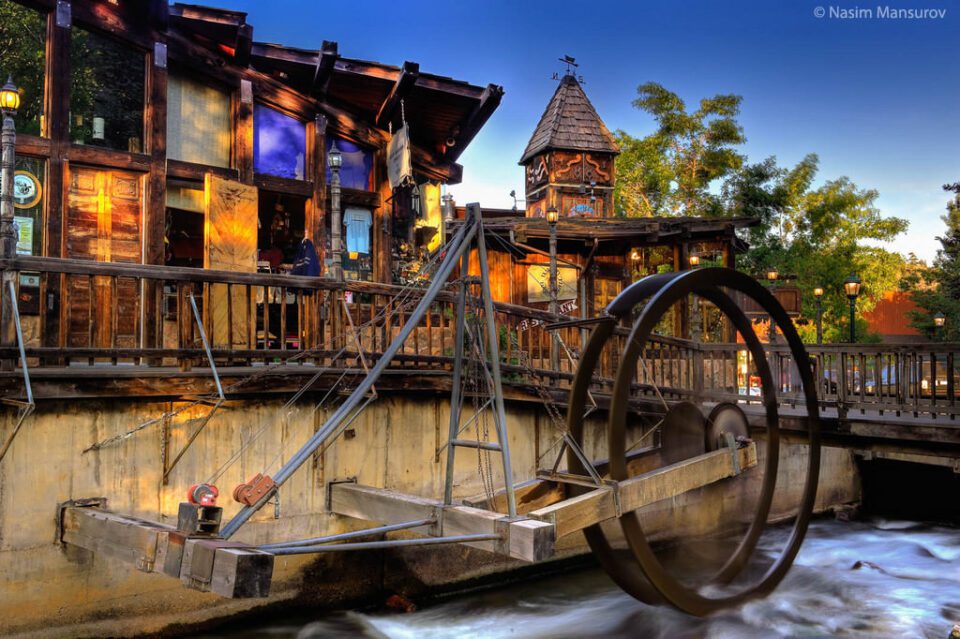
10) The HDR Hole

When I look at most HDR photos, I sometimes wish that HDR was never invented in the first place. HDR is a great technology, but people overuse and over-abuse it too often. Sadly, most HDR photographs appear plain ugly, with photographers trying to pull something special from a failed photo. There is now even a term for such ugly photographs: Grunge HDR – the ugliest thing of the modern photography world. No shadows whatsoever, flat, ugly and over-saturated images. Yuk.

Water Wheel
Water Wheel

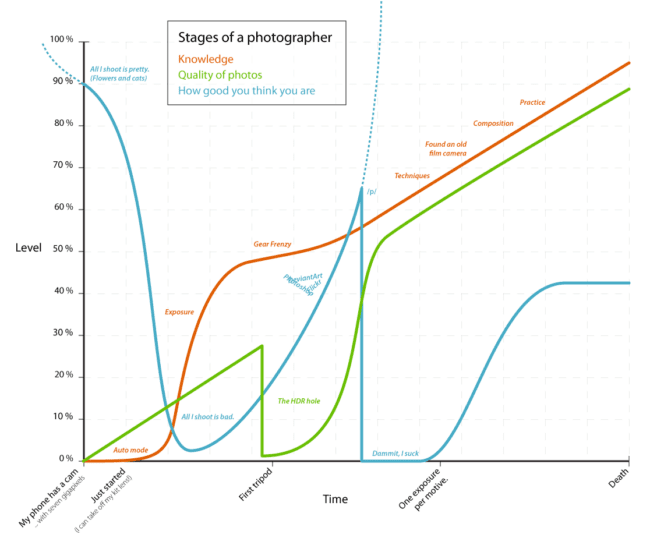
If you find yourself liking such unnatural, ugly photographs, you are probably stuck in the “HDR Hole”. If you have been in the HDR hole for more than a year, it is time to move on from your “GND filters are for noobs” attitude. Buy yourself a good set of filters and learn how to do it right in the camera.

Sadly, many of us get stuck in the HDR hole. I found the below graph to illustrate the point quite well:

Stages of a photographer

Unless you learn how to properly use HDR and make it appear natural, I would recommend to move on to something new / different. In my opinion, exposure blending techniques are often far more useful than automated HDR tools with those Grunge HDR presets.

11) Gear Lust

Many of us are victims of gear acquisition syndrome (GAS). As Bob Vishneski pointed out in his funny “diseases that plague photographers” article, you could have a number of different addictions that will get you nowhere. Stop worrying about your gear and the “latest and greatest”. Upgrade only when you truly need to upgrade. While we post lots of gear reviews and other gear-related content here at Photography Life, we would hate to see any of our readers lust for more gear. Treat photo gear as your tools to create photographs. Do not buy something new just because it is better than what you already have. We typically recommend to skip at least one generation of cameras before upgrading. Manufacturers always want to lure you with newer gadgets, which is why they make more gear year after year. Look at Nikon, which has announced a total of 9 full-frame cameras in the last 2 years! Stop worrying about what you have and concentrate on your photography knowledge instead. Gear lust will get you nowhere.
Nikon D610 vs D800E vs Df vs D4 vs D4s

12) Gear / Technical Problems

If you are constantly fiddling with your camera to set it up properly, have no idea how to yield sharp photos or get your exposure right, it is time to spend a bit more time to get to know your gear. You will not be able to focus on light, composition and framing if technical problems are on the way. First, get to know how to use the tools properly and only then focus on making images. There are many resources to get that knowledge – see our photography tips for beginners section for a long list of articles on exposure, settings and camera gear.

Gear Technical Problems

13) Lack of Composition and Balance

Many of us, including myself, suffer from composition and framing problems. While we are still working on adding more articles on composition and framing, I would recommend to read up on composition from other sources and books. Studying art will give you plenty of education on composition and as you take more pictures and look for better light opportunities, you will learn how to achieve proper visual and color balance in your photographs. Don’t just blindly follow composition “rules” – there are exceptions to every rule. Yes, placing a subject in the middle of the frame rarely works, but it does not mean that you should be avoiding center placement in every photograph just to be in line with the “rule of thirds”.

Negative Space in Composition-1
Negative Space in Composition

14) Those Big and Ugly Watermarks

People get so scared that their photos will be stolen, that they put large, ugly watermarks all over their photos. The thing is, if someone wants to steal your photo, they will find a way to get rid of your watermark. Opening up an image in Photoshop and using the clone tool is not hard and most people know quite well how to do it. And if they don’t, using a simple crop tool found on any photo editing software tool is even easier. In my opinion, the only proper reason to put a watermark in images is to have people find the person who took the photo. And for that intent, adding a small watermark in the corner with your name or logo will be far more useful than slapping on a fat and ugly watermark. From my personal experience, photos that do not contain watermarks or have a very small text/watermark in one of the corners have a higher chance to get “viral” and shared between people on the Internet.

Big and Ugly Watermark
Personally, I rarely ever use watermarks in my photos. I have done it in the past and I abandoned the practice, since they do nothing to protect my work. In fact, I would love to have a big corporation steal my photos, because I would sue the heck out of them and get rich! Sadly, my photos are nearly not as good to be a target of theft!

15) The “Spray and Pray” Mentality

Sadly, digital photography created the “spray and pray” mentality among many photographers, where one takes thousands of pictures, hoping that one of them will turn out to be a Pulitzer prize winner. Those fast frames per second and continuous AF-C modes in modern cameras are not created for the trigger happy photographers that will shoot anything and everything given the chance. They are there for special occasions, such as photographing subjects in motion. Unless you are a sports, wildlife or action photographer, stay away from shooting continuously and focus on capturing unique moments instead. Before you squeeze that shutter release button, pause for a second. Think about what you are about to photograph. Focus on framing, composition, visual balance, background, surroundings and your subject. Don’t take a picture “just in case” and learn to slow down and pre-visualize your shot instead.

No Scent Spray

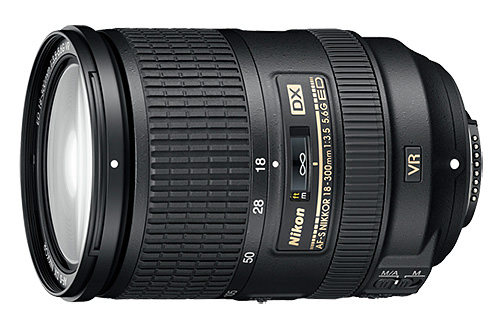
16) That Darn Superzoom!

I dislike superzoom lenses (here comes John Sherman with a part three to his 18-300mm article!). Not because they are generally inferior optically, but because they teach photographers to be lazy. A “one lens for all” attitude might be suitable in rare situations (such as when traveling), but for most of us, it only harms our potential to make great photos.

Nikon 18-300mm f/3.5-5.6G ED VR
Don’t be afraid to carry multiple lenses and swap them. Don’t be so concerned about dust and your gear condition. Move around. Use your feet. Don’t just rely on a superzoom lens to do the walking for you.

7 MAKEUP TIPS MODELS USE

0 comments
7 MAKEUP TIPS MODELS USE

Lets talk about beauty tips that models use today. Let me share with you 7 tips straight from the runway show:

1) Easy and unusual “defrizz”:
Here is the trick straight from a runway backstage. To tame unruly ends of your hair rub a pea-size amount of any hand cream in the palms of your hands and rub it onto the ends of your hair, then brush them. You will have a quick and easy fix.

2) Fuller looking lips:
To achieve fuller looking lips fill them in with the pencil of similar to your lips colour, trace just a little bit outside your natural lip line and then apply a lip gloss with shimmer on top of it, it reflects light and gives the illusion of fuller looking lips.

3) Smoky eyes made easy:
To create a very simple and easy smoky eyes makeup dab a little bit of foundation on your lids (to create a base) and then, apply a soft grey pencil on top of it, blend it gently to create “smudged and smoky” effect. Finish up with great mascara and you are done!

4) High-drama red lips: 
To achieve the high-drama, seductive deep red lips, apply concealer all over your lips prior to applying your lipstick. Then trace the contour of your lips with red pencil. Finish it all up by applying 2 red lipsticks – one darker and another lighter. Use darker red all over your lips and apply the lighter red in the middle of your lips. For more precise result use a lip brush.

5) Perfect face with no effort: 
To create “perfect face” models often use a concealer. To be more precise, they use two concealers – one lighter (for around eyes area) and another slightly darker colour for the areas of the face where they need it. Often the makeup artists apply and blend concealer with their fingers. After this “camouflage”, you don’t even need a foundation on top and it looks very natural.

6) How to look amazing and fresh on pictures?
Models often wear bright red lipstick living the rest of the face bare (or they use just a little bit of concealer to cover spots). It looks amazing on pictures!

7) Make it “pop”:
To achieve a very bright eyes’ makeup apply your eyeshadow with a damp brush, like this the colour of your eyeshadow will really pop. Leave your lips bare or use a neutral lipstick to get balanced and cute makeup.

I hope you found it useful. Please share some more tips from models in the comment’s section below.
Stay beautiful and happy!

Dear Model: Posing Tips for How to Look Your Best in Photographs

0 comments
Published on May 24, 2013 by Jen Brook

dearmodel-9
Dear (new’ish) Model,
My name is Other Model. I have spent the last couple of years finding out a few things that I wish I’d known from the start. Please don’t think I’m patronising as I mean this only in goodwill, as there is absolutely no gain for me by sharing these cheats. Not all of my points will be valid for you as posing varies in each genre. Just take what you can and ignore the rest. If only one suggestion helps your future career then my time has been well spent…

Rule one, the mirror is your BFF. Stand there, perfect your poses and learn how your body shapes. The mirror is a perfect tool to show you what the camera can see – try to imagine it behind your photographers head when shooting and always consider what can be seen from that angle. For example, if your foot is closest to the lens, it is worth remembering that your foot is going to the largest thing in the picture….and nobody wants to be remembered as Bigfoot…
dearmodel-1
Create separation between your limbs from your body. Not only does it prevent the arm/leg from being squashed against you spreading out any fat, it is also an optical illusion for a slimmer appearance in terms of overall width. A basic cheat that makes a massive difference.
Fat arm to thin arm
Fat arm to thin arm
Body width shrunk by optical illusion
Have a basic understanding of light. For example, if you raise an arm to the light, it could be a whole F-stop brighter in camera than your face (being the object closest to the source of light according to the inverse square law). It will also cast a shadow across you. You can counteract this by using your other arm (!)…or, move your arm a fraction backwards, away from the direct beam of light. Learning how lighting falls is invaluable. Ask which is your key light and then work towards it.
dearmodel-4
Be aware of ‘mothing’. If the light has been metered to an exact spot, try to stick to it, or at least notice when you’ve crept closer to the light so you can rectify it if required.
No harry, don’t fly into the light!”…”I can’t help it, it’s so beeeeautiful… (A Bug’s Life)
Recognise when your eyes are over-rotating. It is always advisable to follow the line of your nose to keep your sight central. This stops you from looking bog eyed from too much white of the eye showing.

dearmodel-5
Know how far you can turn your head before your nose ‘breaks your cheek’. Go back to the mirror to see what angle becomes too far. This is perhaps a dying rule, but one that many competition judges still take into account so worth being aware of.
Elongate your neck to simulate height and poise. Possibly one of the hardest things to remember because it genuinely feels unnatural. Stand in front of the mirror and look at yourself…stand normally, then roll your shoulders back allowing your face to come forward…notice the difference in the width of your neck? An instant slimming trick.
Go one step further by popping your jaw towards camera if you want a strong line created by the shadow.
dearmodel-6
If the photographer is at a 12 o’clock angle, then standing angled at 1:30 rather than 3 o’clock will lose inches to your overall width. When you do, make sure it is shadow you are turning into and not the light. Always one rule: hide what you don’t want seen in shadow. Forget Weight Watchers, it’s all about tactical posing!
If you want to appear slimmer you can create a ‘false waist’. You can do this by positioning yourself to camera, then creating the waist you want seen with the positioning of your hands on your ‘hips’. See…crafty huh :)
dearmodel-8
If you’re like me and you don’t have natural curves, then fake them! And I don’t mean plastic surgery. As shown above, learning how to pop your hip is not something everyone can do but can be a big advantage if you can for great shape. Allowing your knees to cross slightly will emphasise that ‘S’ figure with it.
Keep your hands loose and fluid. The term ‘ballet hands’ is often thrown around…but if you’re like me and the only dancing you do well is the truffle shuffle, then keep your middle finger lower than the others whilst relaxing them with a slight curve. Don’t clump your fingers together and avoid showing the back of your hand. Why? Because backs of hands are big and ugly…sides of hands are small and dainty. This was drilled into me from the start of my career by friend and photographer Gary Hill.
See how much longer and larger my hands look when left straight:
dearmodel-11
Play with what is available. If you are wearing a flowing dress, play with it by tossing it into the air or working the movement in the bottom. Remember if you are wearing trousers then your legs don’t need to be so clamped together.
Putting theory into practice in Paris, photograph by Andrew Appleton (MUA Donna Graham & assistant Vicki Head)
You should have knowledge of what you are wearing and why. If you have been hired to sell a specific product, make sure you are pulling poses that are commercially complimentary and not hiding the product.
Own a ‘modelling kit’ and take it on all shoots. These are the things you will need, but may not be directly mentioned in pre-shoot communications. They are; outdoor/studio shoes, nude/black underwear, face wipes, moisturiser/oil for your legs, a plain vest top, safety pins/clamps, a straw for drinks (as not to ruin your lipstick), your own water with a sugary snack to keep you going (your shoot location may be far away from shops), spare stockings for lingerie shoots….and also hairspray, a top up lipstick, hair grips, brush and eyelash glue (in case the MUA can’t stay). If you have been booked for a specific job such as bridal, it is also well received if you bring appropriate accessories i.e. a pretend wedding ring.
Please be honest about your size and measurements. Nobody minds how tall or small, big or slim you are…but they do need to know in advance for obvious reasons. You may be sent home unpaid if you have exaggerated the truth and wasted time by not fitting the casting criteria. Save yourself and others the embarrassment.
Talk to other models, check references and don’t ever assume anything. Despite many people thinking models are the bitchy ones, it’s actually very untrue most of the time. We look after each other and the best out there are very supportive. I was terrified to talk to the people I admired, but then I realised they’re only human, we are all the same…and they’re pretty damn awesome guys and girls when it comes to helping you out.
Most of all be fun, easy going and willing to go that extra mile! If you are genuinely a delight to be around, you are 100% more likely to be rebooked. You are part of a team so pull your weight, diva’s are so 2010.
Fun times to get the shot despite being in the cold rain, creating ‘I bleed colours’ from my personal Dreamcatcher Project with Richard Powazynski, Lauri Laukkanen and Donna Graham
I hope this letter has been of some use to you and that you can take something from it. As I said, not all of this will work for you, it’s just tricks I wish I’d known when I began modelling. But then again look at Kate Moss, she breaks all of the ‘rules’…and still looks amazing – that’s fashion darling.
The day you stop enjoying your job is the day you need a new one. Work hard and love your life!
Kindest regards,
Other Model.

P.S. All pose examples are unedited for a true representation – taken by Jon Brook

P.P.S. If you found this helpful I’d really appreciate it if you ‘like’ my Facebook page and follow me on Twitter. Thank you!


About the author: Jen Brook is a creative fine art, conceptual and fashion model from UK. You can find her on Facebook and on Twitter. She also blogs over on Tumblr. This article originally appeared here.
 

I Am Model Design by Insight © 2009