1) Using Selective Color
Using selective color is a cheesy thing of the past. It was cool back in the day when Photoshop layers were introduced, but the whole trend is now a joke. If you find yourself isolating those pretty flowers from a bridal portrait, please stop. Go back and wipe those pictures out from your portfolio. There are very very very rare cases when selective color really works and I can almost guarantee you that none of your images qualify.
Selective Color
2) Those “Dreamy” Portraits
Diffusion filters suck, plain and simple. They might have looked good back in 1960’s, but that’s about it. If your photography teacher wants you to use a blur filter for portraiture, or you find yourself experimenting with Photoshop blur filters to make your portraits look “dreamy”, time to go back and learn better ways to capture portraits.

Dreamy Portrait
Diffused, blurry portraits are a thing of the past. Time to move on.
3) Impaling and “Horning” Your Subjects
Paying attention to what happens in the background is important when photographing people and other live beings. When photographing subjects with trees, electric poles and other similar objects in the background, avoid “impaling” your subject with the background objects. Pay close attention to the background when composing your shot and if you see anything that clearly stands out behind your subject(s), move around and see if you can find more suitable framing that works. For the below shot of the happy groom, all I had to do was move a little bit to the right and there would not have been a large stick coming out of his shoulder:
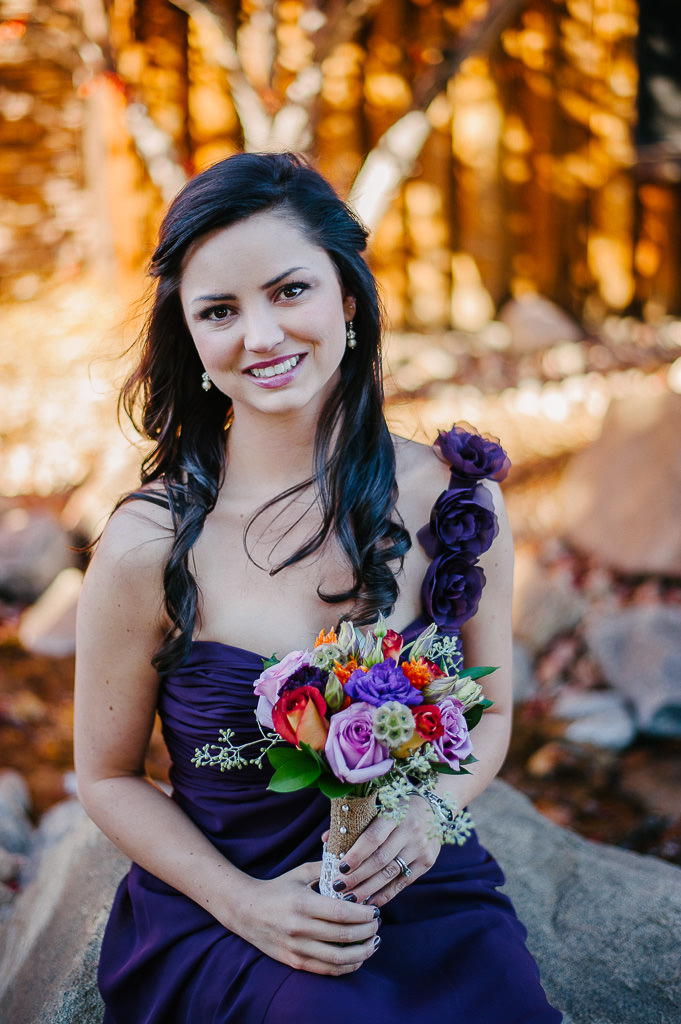
And this pretty bridesmaid would have looked a lot better without the four “horns” in the background:
4) Eye-Level Perspective
Most of us are guilty of walking around straight and forcing eye-level perspective in every shot. If you photograph children or pets, get down on your knees or lay down to get a much better, more natural perspective. Shooting subjects from above is rarely appealing, because you are most likely including the unattractive floor / ground and other objects in the background that should not be in your shot. Change your perspective more often and be creative with how you present your subject.
Different Perspective
5) That Bokeh Craze
If you find yourself in love with bokeh too much and the term “creamy bokeh” is what you are after when photographing your subjects, it might be time to put your favorite 85mm f/1.4 cream machine back in the closet and force yourself to shoot with a wide angle lens for a few months. Completely isolating your subject from the background often takes away the essence and the story of the portrait.
Bokeh Craze
Take a look at some of the iconic and award-winning portraits and note how the photographer placed the subject relative to the background. You will see that without the background, the portrait often loses its essence. It is rare to find story-telling photographs that focus only on the subject alone. Steve McCurry’s “Afghan Girl” is a rare example that really works and even in this case, if it was not for the torn red veil standing against the green background, the captivating eyes of the girl and marks on her face, the picture would have never become so iconic.
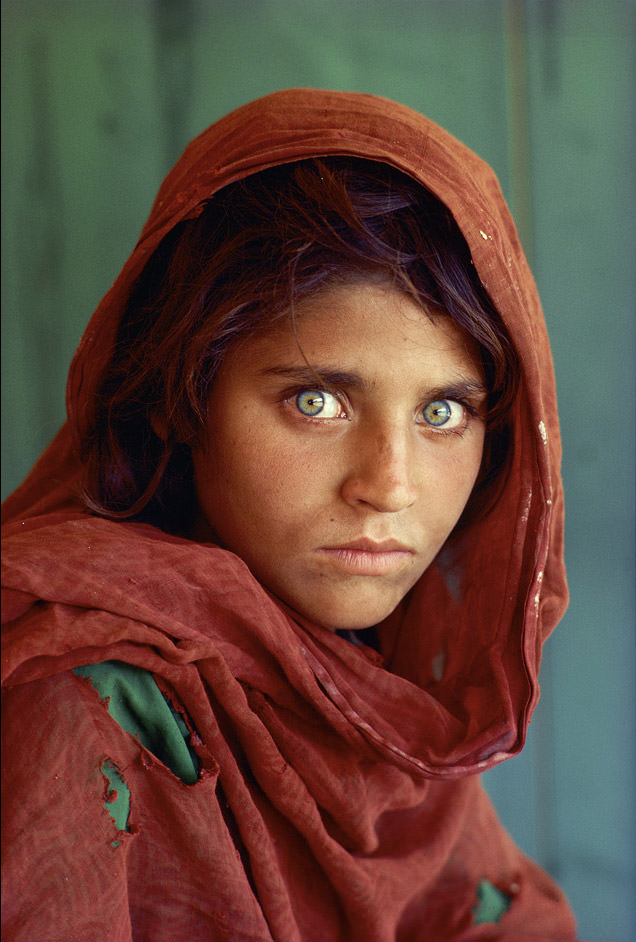
Steve McCurry’s Afghan Girl
Unless your subject alone can tell a story, you should always do your best to include the surrounding environment, since it will not only complete the image, but also make it that much more interesting to look at.
6) The “Natural Light Photographer”
Whenever I hear someone say “I am a natural light photographer”, I already know what it means. 99% of the time, it simply translates to “I have no idea how to use flash”. While natural light is indeed amazing to use in most situations, if you master flash photography, you can make your images appear natural without that “flash” look. Flash is amazing, because it is versatile – you can create light when it does not exist; you can shoot indoors without cranking up that ISO; you can imitate sunrise/sunset and you can eliminate those hard shadows when shooting in mid-day sun. If you have no idea how to use flash, it is time to learn and move away from your only “natural light photographer” mentality.
Beauty Portrait Captured with Flash
There are many great photographers that have mastered both natural light and flash, and they do not fall into this category.
7) Converting Blurry Images to Black and White
Although sharp photos are not an absolute requirement in portrait photography, you will rarely see magazines and online publications publish photos that are blurry due to bad focus and camera shake. There is a clear difference between intentional blur and blur due to photographer’s error. I have seen many examples of portrait and wedding photographers resorting to black and white conversion when they capture an important photo that they could not capture properly. Why black and white? Because it makes the photo appear like old B&W film photos, which were often blurry, due to technical limitations of camera gear in the past. Hence, such black and white conversion technique is used to hide mistakes. While I personally love beautiful black and white photos, seeing a large number of badly focused photos converted to black and white just tells me that either the photographer has no idea how to properly focus, or has technical problems with their gear. If you find yourself resorting to such conversions too often, perhaps it is time to learn how to use those autofocus modes. And if your gear is malfunctioning, it might be time to get it properly serviced and calibrated.8) Using Wide Angle Lenses for Portraits
That nifty fifty lens of yours is great for everyday photography and portraiture. But if you put it close enough to a subject, it will surely distort their face. Anything below 60-70mm tends to distort and “warp” subjects when they are too close, making their facial features appear unnaturally big. It is one thing to go wide for fun, and another to distort a good looking subject by either going too wide or being too close. If you use a 50mm lens, don’t try to frame your shot by filling the subject’s face, especially on full-frame cameras. If you really need to get that close, use a longer focal length lens. An 85mm portrait lens would fit be much more suitable for the job.

Wide Angle Close-Up
9) Over-Saturation Galore
I have seen so many great images butchered with crazy colors. When I teach workshops, I always ask people to stay away from the “Saturation” sliders as much as possible. A little bit of color saturation is not bad, but too much color makes images appear fake and unnatural. While the definition of color and its intensity varies greatly between photographers, an over-saturated image is easy to identify. Stay away from too much color saturation and do your best to make your photos appear as natural and balanced as possible.
Over-Saturated Image
10) The HDR Hole
When I look at most HDR photos, I sometimes wish that HDR was never invented in the first place. HDR is a great technology, but people overuse and over-abuse it too often. Sadly, most HDR photographs appear plain ugly, with photographers trying to pull something special from a failed photo. There is now even a term for such ugly photographs: Grunge HDR – the ugliest thing of the modern photography world. No shadows whatsoever, flat, ugly and over-saturated images. Yuk.
Water Wheel
If you find yourself liking such unnatural, ugly photographs, you are probably stuck in the “HDR Hole”. If you have been in the HDR hole for more than a year, it is time to move on from your “GND filters are for noobs” attitude. Buy yourself a good set of filters and learn how to do it right in the camera.
Sadly, many of us get stuck in the HDR hole. I found the below graph to illustrate the point quite well:
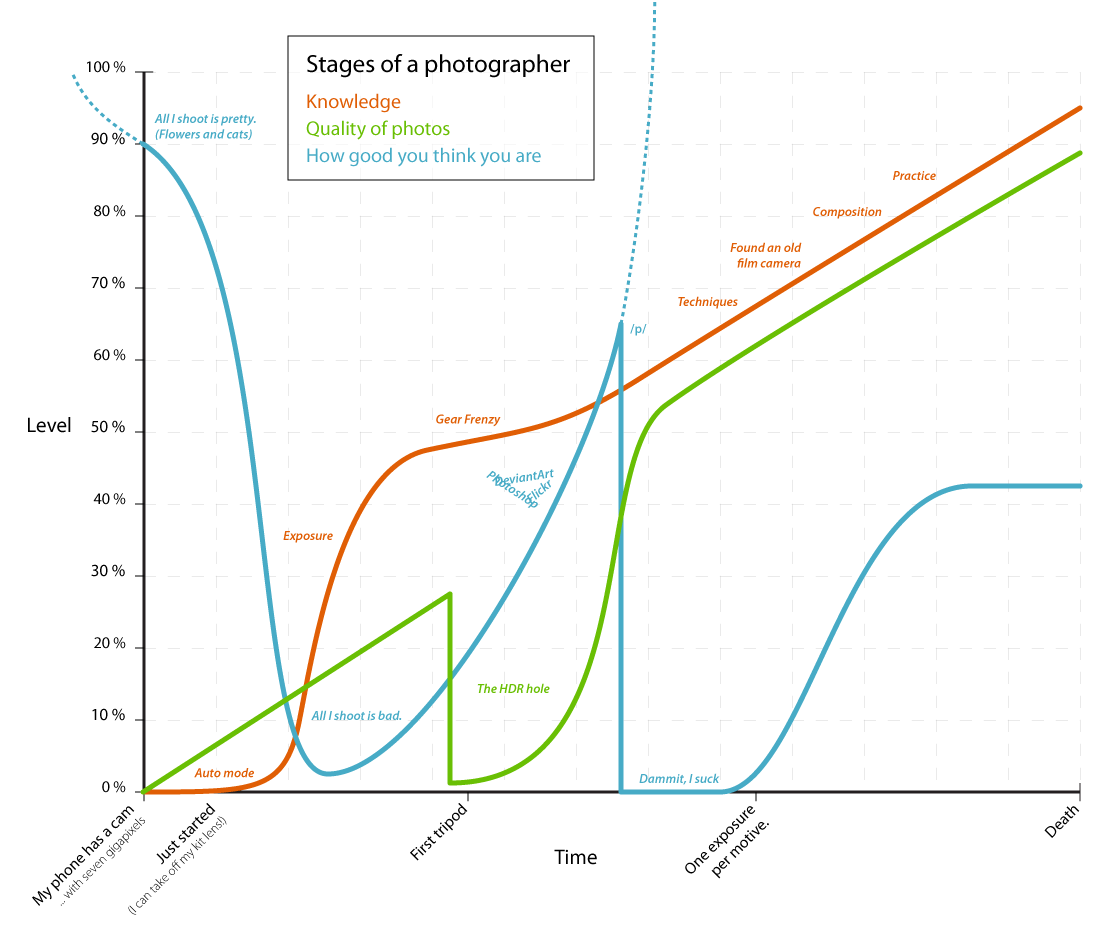
Stages of a photographer
Unless you learn how to properly use HDR and make it appear natural, I would recommend to move on to something new / different. In my opinion, exposure blending techniques are often far more useful than automated HDR tools with those Grunge HDR presets.
11) Gear Lust
Many of us are victims of gear acquisition syndrome (GAS). As Bob Vishneski pointed out in his funny “diseases that plague photographers” article, you could have a number of different addictions that will get you nowhere. Stop worrying about your gear and the “latest and greatest”. Upgrade only when you truly need to upgrade. While we post lots of gear reviews and other gear-related content here at Photography Life, we would hate to see any of our readers lust for more gear. Treat photo gear as your tools to create photographs. Do not buy something new just because it is better than what you already have. We typically recommend to skip at least one generation of cameras before upgrading. Manufacturers always want to lure you with newer gadgets, which is why they make more gear year after year. Look at Nikon, which has announced a total of 9 full-frame cameras in the last 2 years! Stop worrying about what you have and concentrate on your photography knowledge instead. Gear lust will get you nowhere.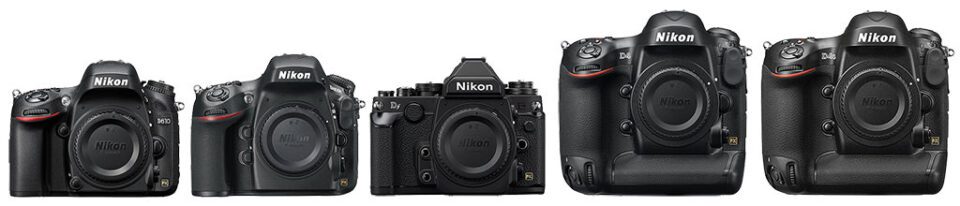
12) Gear / Technical Problems
If you are constantly fiddling with your camera to set it up properly, have no idea how to yield sharp photos or get your exposure right, it is time to spend a bit more time to get to know your gear. You will not be able to focus on light, composition and framing if technical problems are on the way. First, get to know how to use the tools properly and only then focus on making images. There are many resources to get that knowledge – see our photography tips for beginners section for a long list of articles on exposure, settings and camera gear.
13) Lack of Composition and Balance
Many of us, including myself, suffer from composition and framing problems. While we are still working on adding more articles on composition and framing, I would recommend to read up on composition from other sources and books. Studying art will give you plenty of education on composition and as you take more pictures and look for better light opportunities, you will learn how to achieve proper visual and color balance in your photographs. Don’t just blindly follow composition “rules” – there are exceptions to every rule. Yes, placing a subject in the middle of the frame rarely works, but it does not mean that you should be avoiding center placement in every photograph just to be in line with the “rule of thirds”.
Negative Space in Composition
14) Those Big and Ugly Watermarks
People get so scared that their photos will be stolen, that they put large, ugly watermarks all over their photos. The thing is, if someone wants to steal your photo, they will find a way to get rid of your watermark. Opening up an image in Photoshop and using the clone tool is not hard and most people know quite well how to do it. And if they don’t, using a simple crop tool found on any photo editing software tool is even easier. In my opinion, the only proper reason to put a watermark in images is to have people find the person who took the photo. And for that intent, adding a small watermark in the corner with your name or logo will be far more useful than slapping on a fat and ugly watermark. From my personal experience, photos that do not contain watermarks or have a very small text/watermark in one of the corners have a higher chance to get “viral” and shared between people on the Internet.
Personally, I rarely ever use watermarks in my photos. I have done it in the past and I abandoned the practice, since they do nothing to protect my work. In fact, I would love to have a big corporation steal my photos, because I would sue the heck out of them and get rich! Sadly, my photos are nearly not as good to be a target of theft!
15) The “Spray and Pray” Mentality
Sadly, digital photography created the “spray and pray” mentality among many photographers, where one takes thousands of pictures, hoping that one of them will turn out to be a Pulitzer prize winner. Those fast frames per second and continuous AF-C modes in modern cameras are not created for the trigger happy photographers that will shoot anything and everything given the chance. They are there for special occasions, such as photographing subjects in motion. Unless you are a sports, wildlife or action photographer, stay away from shooting continuously and focus on capturing unique moments instead. Before you squeeze that shutter release button, pause for a second. Think about what you are about to photograph. Focus on framing, composition, visual balance, background, surroundings and your subject. Don’t take a picture “just in case” and learn to slow down and pre-visualize your shot instead.
16) That Darn Superzoom!
I dislike superzoom lenses (here comes John Sherman with a part three to his 18-300mm article!). Not because they are generally inferior optically, but because they teach photographers to be lazy. A “one lens for all” attitude might be suitable in rare situations (such as when traveling), but for most of us, it only harms our potential to make great photos.
Don’t be afraid to carry multiple lenses and swap them. Don’t be so concerned about dust and your gear condition. Move around. Use your feet. Don’t just rely on a superzoom lens to do the walking for you.


0 comments:
Post a Comment